Let's have pit stop
Let's refactor our code first before writing any tests.

👋 Hi, I'm Wilfred.
I'm a software developer and I love sharing stuff that I learn.
Introduction
In the previous chapter, I implemented the code for task 1. I however sighted a couple of issues with my code. For example, the CarPark class has mixed concerns; validating booking dates and creating bookings. As a result, our code is untestable and unmaintainable.
In this chapter, I'll separate concerns by moving the CarPark class's validation logic to a new class. Second, I'll split the main function into several functions to capture different types of user input. Finally, I'll configure Intellij IDEA to automatically delete unused imports, and then I'll set up a GitHub workflow and add a testing badge to our README file.
The repository
The project source code is found here: igcse-pre-release.
Let's refactor
Date validation code
The CarPark class must be relieved of any functionality that it must not undertake, such as date validation. I wrote a BookingDateValidator class and put all of the date validation functions into it. I also added two new Exception classes, which are thrown when the date format is incorrect or the selected date does not fulfil the booking requirements.
import exception.InvalidDateException;
import exception.InvalidDateFormatException;

import java.time.LocalDate;
import java.time.LocalDateTime;
import java.time.format.DateTimeFormatter;

public class BookingDateValidator {
    private static final String DATE_FORMAT = "dd-MM-yyyy h:mm a";
    private static final DateTimeFormatter dateTimeFormatter = DateTimeFormatter.ofPattern(DATE_FORMAT);

    public static LocalDateTime validate(String date) throws InvalidDateFormatException, InvalidDateException {
        LocalDateTime bookingDate = getLocalDateTime(date);

        try {
            validateBookingDate(bookingDate);
        } catch (InvalidDateException e) {
            throw new InvalidDateException(e.getMessage());
        }

        return bookingDate;
    }

    private static LocalDateTime getLocalDateTime(String date) throws InvalidDateFormatException {
        LocalDateTime bookingDate;
        try {
            bookingDate = LocalDateTime.parse(date.toUpperCase() + " 8:00 AM", dateTimeFormatter);
        } catch (Exception e) {
            throw new InvalidDateFormatException("Unable to create date time from: [" + date.toUpperCase()
                    + "], please enter date with format [dd-MM-yyyy].");
        } return bookingDate;
    }

    private static void validateBookingDate(LocalDateTime bookingDate) throws InvalidDateException {
        if (bookingDate.toLocalDate().isBefore(LocalDate.now()))
            throw new InvalidDateException("Booking date: " + bookingDate.toLocalDate()
                    + " can not be before the current date: "
                    + LocalDate.now());

        var dateAfterTwoWeeks = LocalDateTime.now().plusDays(CarPark.BOOKING_PERIOD);
        if (bookingDate.isAfter(dateAfterTwoWeeks))
            throw new InvalidDateException("Bookings can only be made within a "
                    + CarPark.BOOKING_PERIOD + " day period from the current date: "
                    + LocalDate.now());
    }
}
Here are the changes to the Main class. The readBookingDate method is now shorter since the validation functions are now entirely handled by BookingDateValidator's validate method.
public class Main {
  //... code elided

    public static void main(String[] args) {
            //... code elided
            try {
                bookingDate = readBookingDate();
                //... code elided
            } catch (...
                     InvalidDateException |
                     InvalidDateFormatException  e) {
                System.err.println("Error: " + e.getMessage());
                continue;
            }
            //... code elided
    }
//... code elided

    private static LocalDateTime readBookingDate() throws InvalidDateException, InvalidDateFormatException {
        Scanner scanner = new Scanner(System.in);

        System.out.println("Enter your most favourable booking date: ");
        String date = scanner.nextLine();

        return BookingDateValidator.validate(date);
    }
}
Carpark class
Another key update that I think is important is on the PRICE_PER_PARKING_SPACE constant. Instead of recreating the Money object using this value, as in the below code, I think it's best to make it a Money object itself.
public static final float PRICE_PER_PARKING_SPACE = 3.0f;
//... code elided
Money parkingCost = new Money(Currency.getInstance(CURRENCY_CODE), BigDecimal.valueOf(PRICE_PER_PARKING_SPACE));
booking.setParkingSpace(new ParkingSpace((int) count + 1, parkingCost));
Solution:
public static final Money PRICE_PER_PARKING_SPACE = new Money(Currency.getInstance(CURRENCY_CODE), BigDecimal.valueOf(3.0f));
//... code elided
booking.setParkingSpace(new ParkingSpace((int) count + 1, PRICE_PER_PARKING_SPACE));
Payment method selection
Currently, the user inputs the name of the payment method. That's not cool, is it? Let me fix that by enabling the user to choose a number from the presented list that corresponds to the payment method. For instance, 1 for credit card payment, and so on.
private static Visitor createVisitor() throws IllegalArgumentException, InvalidInputException {
    // ...code elided

    System.out.println("We only allow 3 payment methods: " +
            "\n1. Credit/Debit card \n2. Ecocash \n3. Onemoney");
    System.out.println("Select a number corresponding to your favourable payment method");
    int choice = scanner.nextInt();

    PaymentMethod paymentMethod = PaymentMethodFactory.getInstance(getPaymentChoice(choice));
    // ...code elided

    return newVisitor;
}

private static PaymentType getPaymentChoice(int choice) throws InvalidInputException {
    String paymentMethod;

    switch (choice){
        case 1: paymentMethod = "CREDITCARD";
            break;
        case 2: paymentMethod = "ECOCASH";
            break;
        case 3: paymentMethod = "ONEMONEY";
            break;
        default:
            throw new InvalidInputException("Incorrect choice");
    }
    return PaymentType.valueOf(paymentMethod);
}
Clean up imports
I hate unused code! Let me show you how to auto-delete unused imports. First, go to settings, then in the settings search bar search for "auto-import" and select it under the Editor section. Check the box for "optimize imports on the fly". Done!

The workflow
In this section, I will demonstrate my GitHub workflow for running JUnit 5 tests in a Maven-based project and then add a build status badge in the README file. For a detailed explanation of this workflow, refer to this blog post.
GitHub actions
It's really simple. After creating the workflow on GitHub I added the following actions in the created junit-5-tests.yml file. Note that the name of the file doesn't have to be junit-5-tests.yml. It's all up to you.
name: tests
on: push
jobs:
  run_tests:
    runs-on: ubuntu-latest
    steps:
      - name: Checkout the repository
        uses: actions/checkout@v2
      - name: Set up JDK 11
        uses: actions/setup-java@v1
        with:
          java-version: 11
      - name: Cache Maven packages
        uses: actions/cache@v2
        with:
          path: ~/.m2
          key: ${{ runner.os }}-m2-${{ hashFiles('**/pom.xml') }}
          restore-keys: ${{ runner.os }}-m2
      - name: Run tests with Maven
        run: mvn -B test --file pom.xml
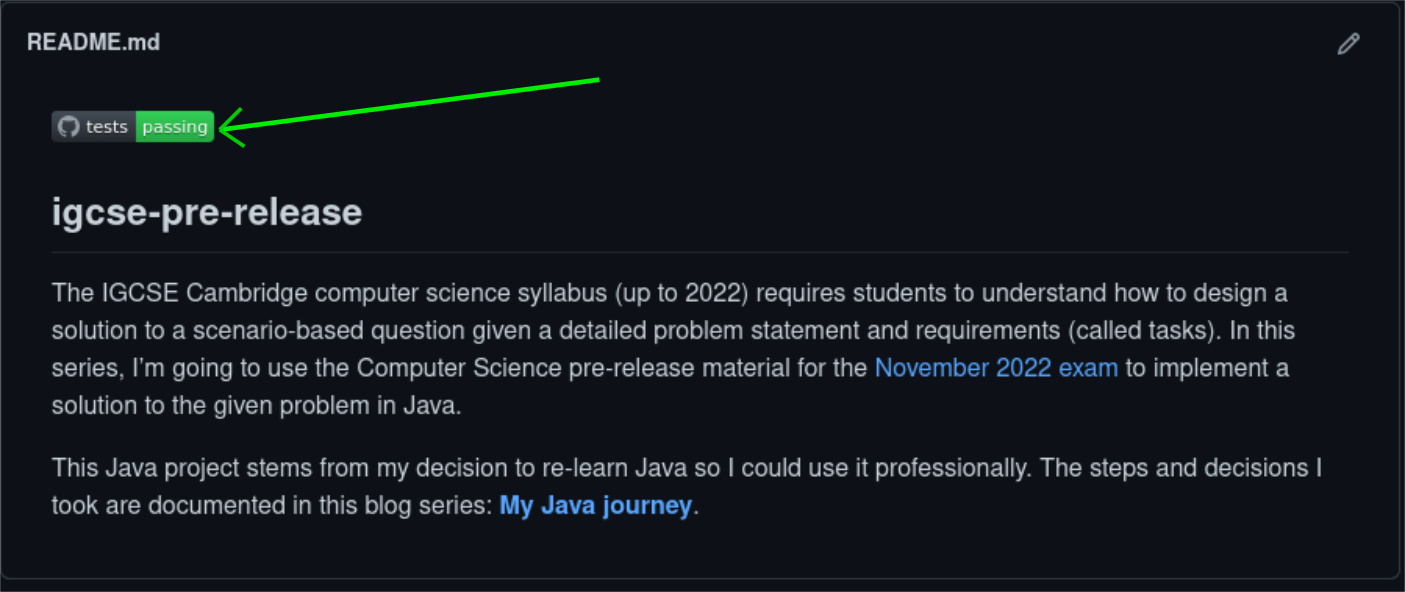
Build status badge
The reason for adding a badge to the README.md file is to show repository visitors that the project builds properly and all tests pass.
To add a badge, simply add the following URL at the top of your README file. Replace placeholders with appropriate information to receive a badge for a workflow. Note, the WORKFLOW_NAME is a name defined in the first line of the yml file and does not have to be the file name:
https://github.com/<OWNER>/<REPOSITORY>/workflows/<WORKFLOW_NAME>/badge.svg
Our README file now looks like this:

//....
The outcome:
Conclusion
The CarPark class is now simple to test and modify without impacting other classes because it now has one job. Also, data capture is now more user-friendly and less error-prone. Lastly, our IDE now automatically removes unneeded imports, and we have a testing workflow and a README file badge.


